Showing posts with label Decor. Show all posts

Monday, July 15, 2013

It was time...

...to change things up around the house.

I had gotten to my breaking point with the way things were arranged in our family room and was ready for a change. Up till now the bulk of the kids toys were stored in half of the family room. However, due to the narrowness and the depth of the room the kids toys were really starting to take over everything. Everything. And this is with me rotating toys in and out of the attic on a frequent basis. So, we got to thinking about things...

Another problem we were starting to look to problem solving was what to do about transitioning Avi-Kate to a big girl bed. She hadn't tried to climb out but it was bound to happen in the near future. Transitioning with AG was SO EASY because his room has a built in niche that a twin mattress fits in to perfectly. We only bought one bed rail and he never fell out of the bed because he was walled in on all four sides. It was amazing. In Avi-Kate's room we have the queen size guest bed with girl themed bedding. I wasn't crazy about sticking her in this bed yet just because it is so high off the ground and she wouldn't be able to get in/out of it by herself...plus I didn't want to have buy more bed rails! I really just wanted to stick her in AG's twin bed but I didn't want to buy twin girl bedding when I just bought her queen size bedding a year ago. And then it dawned on me. All of my twin college bedding is in perfect condition and just hanging out in the attic. So...we've taken the plunge and flipped the kids bedrooms! AG was not excited at first and Avi-Kate was confused because she was still happy in her crib. The biggest reasons we went ahead and did it were 1.) We were going to the beach for a week and Avi-Kate was going to sleep on a twin bed all week. We didn't want to come home after a week in a bed and move back to the crib. Let's just keep moving forward. 2.) We wanted to do it before AG starts back to school so that he has time to adjust and we can get the house ready for the upcoming year. Due to the insane amount of rain we got the week of July 4th we spent the holiday flipping the kids rooms and then went on vacation. Now that we are back I've got a little less than three weeks to get everything situated the way I want it. AG starts school August 5th! We need to figure out bedding for AG but at the moment he's content with clean sheets and the down comforter. Buying bedding for him wasn't a big deal to me because we figured when we moved to the next house he'd most likely end up in a bigger bed...not like spending money for twin girl bedding that she may use for a year or two at the most. I'm currently mulling several different possibilities for him. The only thing we know for sure is that we have to buy him a set of Grinch flannel sheets this fall from Pottery Barn Kids since Avi-Kate has inherited his twin Grinch sheets. And that will be a problem if she gets the twin ones and he doesn't have a new set because he loves sleeping on them. Last winter I  had to wash them and then put them straight back on the bed because he insisted on sleeping on them till well after Christmas.

By moving the kids rooms and taking down the crib we were able to move their toys in to their rooms. With plenty of space for them to play and spread out without overtaking the family room. Hallelujah! Ideally, in the next house we'll have a designated play space room/nook. The family room is much more spacious now and doesn't make me claustrophobic. We rearranged a few pieces in it and I have some ideas for new art on the walls. Andy wants to paint the kids rooms and I'm thinking about painting some of our common living spaces. We've been in this house now for over six years and I'm ready for a new color palate. The only room that is guaranteed not to be touched is the dining room. The cranberry red isn't going anywhere! Which is a good thing...I think Andy would flip if I suggested painting over it since red is such a hard color to paint. ;)

So, while I'm flipping, cleaning, reorganizing, and purging I'm also mulling paint ideas and decor. I'll start posting pictures once I get things back in order but I am really, really happy with how things are turning out at the moment.

I'm also sorting clothes and looking to do a massive purge of baby gear/clothes. We have several consignment sales coming up in August/September and I'm seriously mulling putting stuff in both sales to clear stuff out. We only have so much room and because the kids are not the same sex there are very few things that we save for AKs to wear that were AG's. It's kind of sad to me to think about getting rid of the baby stuff but I'm really content with our lives right now and the season that God has us in. Looking forward to moving ahead to see what all he has in store for us.
 

Wednesday, January 23, 2013

Christmas Catchup #4...House Decor.

I always love looking back each year at the pictures of how we decorated the house. Due to both kids being sick and the usual holiday chaos I didn't get to photograph everything and I have to be okay with that...that's life, right? Anyways, here's some of what I was able to capture at random points over the holidays. Goal next year: To do a full house tour and a link up party...actually, that was the goal this year and it didn't happen. We'll see if I can get it together later this year. :)

Our master bedroom furniture is a mixture of pieces that we've slowly refinished over the years. Our headboard is an old fireplace mantle. (I thought I had blogged about it years ago and went back to find the post on it but can't seem to find one. Note to self: blog about refinishing the mantle.) I love the mantle because I can change out what's on it whenever I feel like it and decorating it at Christmas is my favorite. Every year I put fresh greens on it and lights. I love laying in bed reading with the lights glowing above my head. Anyways, here's a few pictures of the mantle. 


Our tree is a Virginia Pine and we cut it down at the tree farm 5 minutes from out house. I have to say I think this was probably my favorite tree out of all the ones we have had to date. Like always, we wrap everything in brown paper. We started this tradition the first year we were married and have done it every year since. All of the gifts have the same ribbon...a red with white stitching. The children each have their own ribbon that they picked out in addition to Andy and I having our own ribbons. It works well for us and is wonderfully simple.


A few of the ornaments on the tree this year...Disney did a series of ornaments known as 'Sketchbook Ornaments' and there was a Peter Pan ornament in the collection which we had to buy for AG because he is obsessed with all things Pan. It is, by far, his most favorite movie, ever. We bought Avi-Kate a sweet Alice ornament for her collection since she hasn't really become to particular yet about her favorite movies/characters. AG's favorite Christmas movie is Charlie Brown and one of my childhood friends, Jonathan, sent AG a surprise Charlie Brown ornament for the tree. Jonathan--The ornament is safely packed away but AG made off with the box and I couldn't find it when packing up the decorations...a few days ago I discovered that he had been sleeping with the box and it was nestled amongst his pillows. Thanks again! He absolutely adores it...and the box.


Our friend and neighbor, Cabell, designs ceramic pottery that you may have seen. We have several of her pieces including this sweet ornament that my sister gave me a few years ago and our Santa plate/cup are also designed by Cabell.
Williamsburg ornaments are everywhere on our tree. It continues to be one of my favorite places in all the world and I am so excited that we are going back later this year for Edwards Family Vacation. Last time we were there AG was not quite two and I was pregnant with Avi-Kate but didn't know it. Needless to say, it's been a few years and we are ready to be back in the historic triangle.
My grandmother loved all things Waterford and was quite the collector. She left each of the granddaughters a collection of ornaments. They are some of my most treasured possessions. My grandmother had an entire full size tree decorated in just Waterford ornaments. At the moment mine fit perfectly on this small faux tree. In addition to the collection of my grandmother's I've started collecting two new series of ornaments. I love how the crystal looks with white lights and I think about my grandmother every time I look at it.
Thanks to mom for giving us this Cabell's Too plate and mug several years ago...it is now firmly part of our Christmas traditions.
(Sigh) My goal was to get one of the photos we had taken this fall blown up and in to the frame above the fireplace before I decorated for the holidays...clearly that didn't happen and needs to be at the top of my to do list for the new year.

Kitchen chalk art leftover from the church Christmas party that I ended up just reusing for the rest of the month.
One of the things I love about our house is the huge window ledge in the den and the similar one in the master bathroom. I enjoy decorating them over the course of the year. This year we went with fresh greens, pine cones from Berry, fresh finds from the farm (peanuts, pecans, dried corn), and some faux fruit.


There is something so peaceful about a quiet house late at night with Christmas lights all aglow. One of my favorite things during the holidays. I love to sit and soak it all in around the house.


Almost done with Christmas posts! All I have left is Christmas Eve/Christmas Day/Edwards Family Christmas which will most likely all get rolled in to one long post. After that it'll be on to running the half, life right now, projects I'm working on, etc.

Tuesday, January 22, 2013

Christmas Catchup #1...

A bunch of the ladies in our church get together every few weeks to have craft night so that we can work on our current projects together. Anyways, when the Christmas season started we spent one evening prepping our building on Broad Street for the holidays. We decorated trees, hung pinecones in the windows, and some of the ladies created a gorgeous huge wreath for the front window. Then the day of the church Christmas party I came back and added small touches...lanterns, jars filled with candles and natural filler, fresh greens, jumbo pinecones from Berry, etc. I decided to use natural fillers in the jars of things from the farm and went with whole pecans and dried corn. (I have a huge bucket of natural fillers bagged that I keep in the laundry room and I pull it out when I decorate/host parties.) I think it turned out beautiful and quite rustic. The party was wonderful and we enjoyed having a night out with no children. 

Here's a few pictures right before the party started:


Sorry for the wave of posts that I am doing to get caught up. I feel the need to post/document even if it is just small snippets and pictures. One day I'll be glad that I did it, right? That's what I keep telling myself.  

Friday, November 2, 2012

I'm in love with burlap...

...so like most people these days I love, love, love Pinterest. I joined waaaaay back when they were first starting and have enjoyed making it a place to save things that I want to do and remember. I will say that I don't pin every single thing that I see. I really and truly only pin things that I love or want to do or need to remember. If you would like to follow me you can find me here.

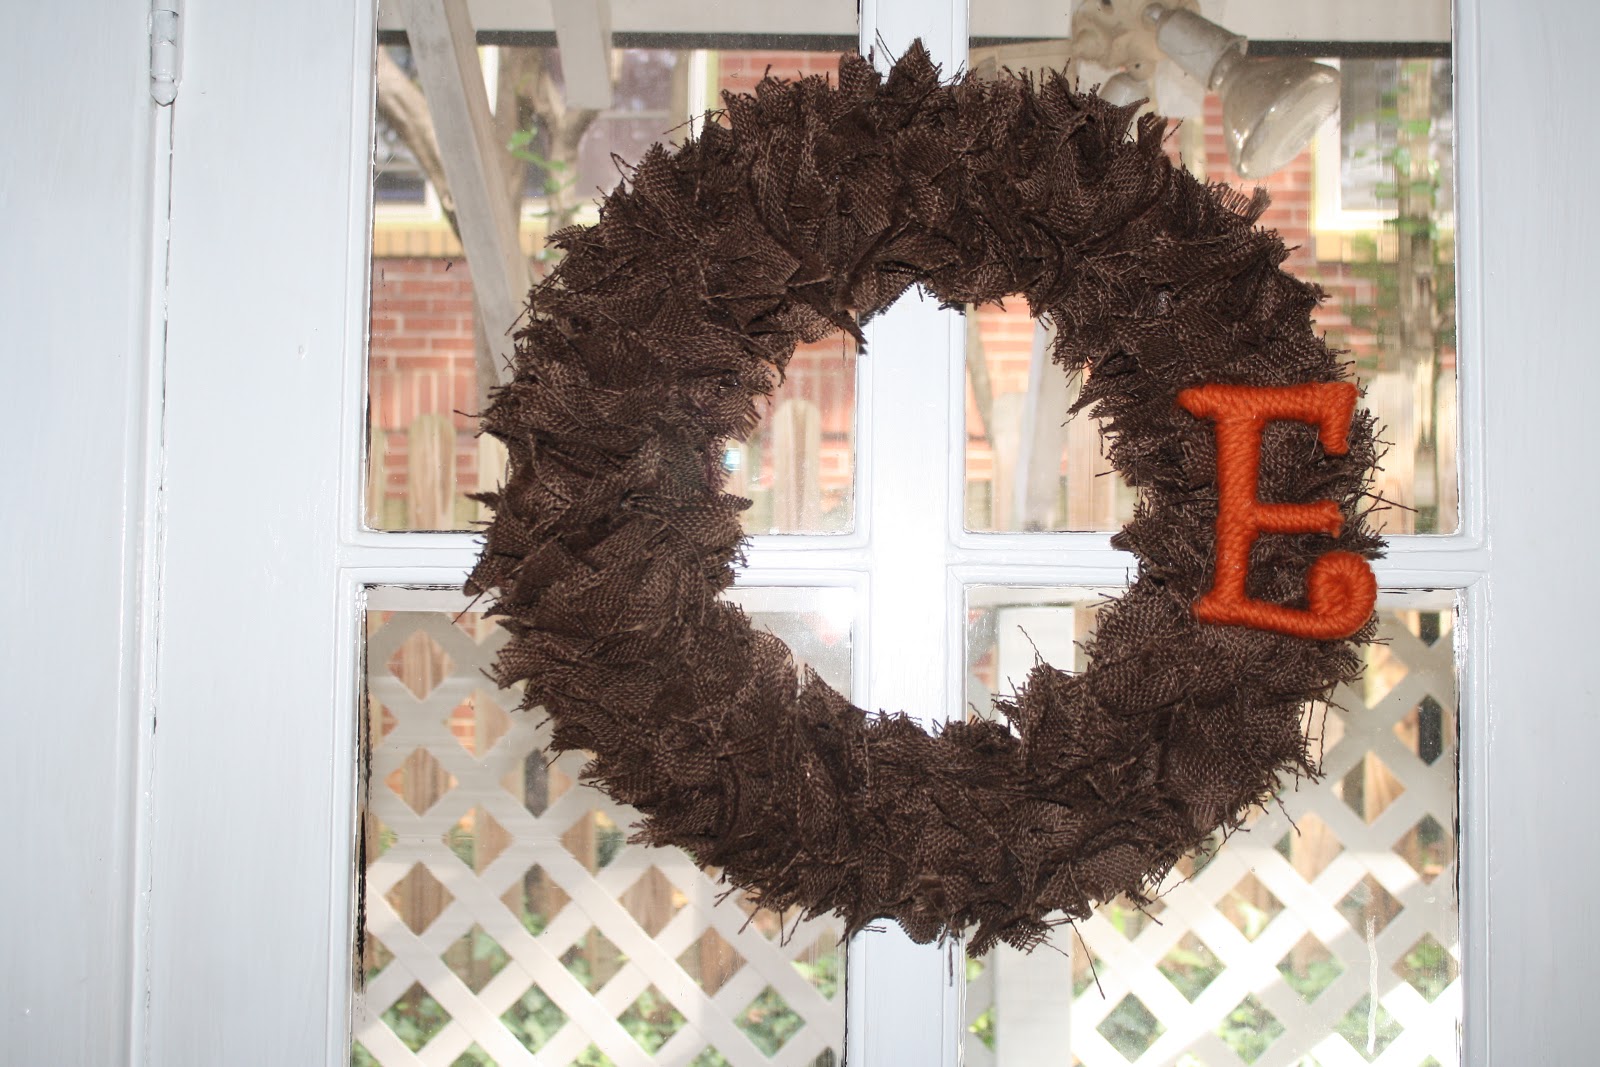
Now before Pinterest was around I discovered a wreath on a blog that I knew I could recreate. This was almost two years ago but I was pregnant at the time and then last year I had a small baby...who has time to craft when you have a new baby?! Anyways, this year I set about to creating a burlap wreath for the kitchen door for the fall. And while I was at it made one for my dear friend, Ginny.

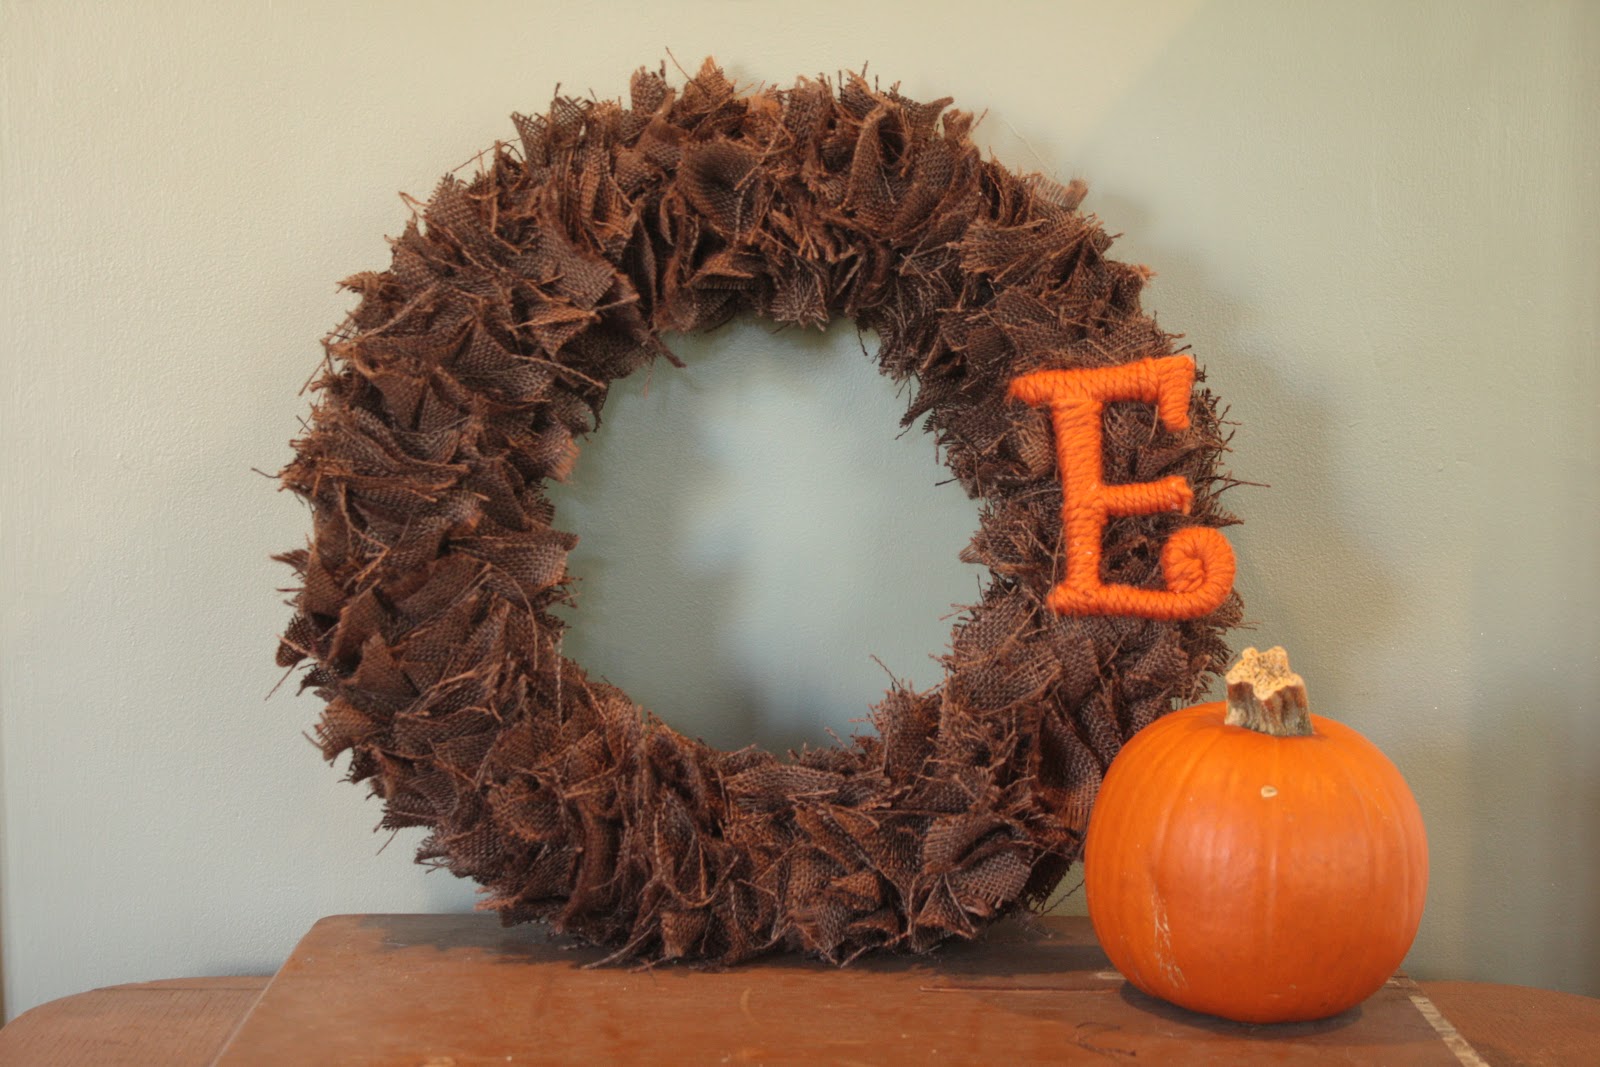
Here's what I ended up with:
I'm in love with it. I have a TON of leftover yarn and I'm hoping that Ginny can show me how to knit/crochet some flowers to add to it for next year. But for now, and the craziness that is my life with two small kids, I'm pretty pleased with how it turned out. 

To make your own burlap creation you will need:

~Burlap--Any color. I did mine in chocolate and Ginny's is a neutral with a green tint to it. I used a full two yards on both wreaths. I wanted them to be really full. I bought all of my burlap at Hobby Lobby.

~Foam wreath form

~Scissors

~Hot glue

~Time! While this project isn't hard it does require a chunk of time to get it assembled. I watched one of the presidential debates while assembling mine.

~Letter--If you want to do a letter you'll need a wooden letter, yarn, and more hot glue.

Here we go:

Cut your burlap in to strips. You can be precise and make them two/two and a half inches each or you can eyeball it. I prefer to eyeball it and with this type of craft it won't matter which way you did it. 
 Cut your strips in to squares and stack them together. I would cut and stack in to several piles to be able to grab and go from.
 Next, fold your square in to a triangle and then fold it in to another triangle. You can put a dab of hot glue on the inside to make them hold their shape better.
 Wrap the point in hot glue and then stick it on your wreath. You can do this two ways you can make a bunch of triangles at once and then apply hot glue to the tip when you are ready to attach OR you can make them one at a time and attach as you go. I did it both ways and they both took about the same amount of time. Pick your preference and go with it.
Then, go to town and begin filling in. I wrapped/covered mine all the way around because I wanted the whole thing covered. Do it however you want. Also, heads up burlap sheds like crazy when you are cutting it/working with it. Once it is finished you won't have issues with it. 
Now for the letter...originally I had chosen big, thick, blocky type script for both my letter and Ginny's. However, I quickly realized that I was going to have a hard time getting it covered in yarn and looking 'clean' the way I wanted it to. I didn't want it to look tacky after all the time I spent on the wreath. I then picked up a smaller letter with thinner font and it was MUCH easier to cover. Take time and play with the yarn and the letter before you begin covering it for real. Once I got a section the way I wanted it I quickly unwrapped it and applied small dabs of hot glue in spots and quickly re-wrapped it. I did this section by section until it was finished. Here's what the 'E' looks like up close. 
I then took some craft wire and slipped it through the back of the E and then secured it to my wreath. I did it in such a way that I can easily remove it and change it out for something else if I want. 


 Hang and enjoy...and get lots of compliments on your handiwork. I've had several family members put in requests for wreaths now. :) I also wanted to hang mine with a satin ribbon but I couldn't find a ribbon that matched the yarn I used. I'll keep looking for next year. If I had had more time I was planning to make a red and black UGA wreath with burlap I picked up at Hobby Lobby...but I was doing good to get Ginny's done in September and mine done by Mtn. Day weekend. It's going on my to do list for next summer so it's ready in time for football next year. What craftiness have you been up to lately?


Thursday, June 21, 2012

Details sneak peek of Avi-Kate's room...


A few details...full pictures once I get everything on the walls the way I want it. I must say that it's coming along and I really love how it's turning out. Stay tuned.

Friday, July 23, 2010

Art and a headboard...

...that's what we are making/working on this weekend. 

First up, we have the headboard that I've been talking about for weeks. Due to the chaos that is life we have not gotten around to them till now. This project should be fairly inexpensive considering what the end result will be. The doors were free from Andy's mom. When she did renovations/preservation work on the old barn they were discovered up in the loft I believe. We finally hauled 'em back from the farm Memorial Day weekend. So all we have to purchase is the painting supplies.

We have a lot of black furniture. And we have a lot of distressed furniture. I decided that we needed to at least change it up a bit even though a black headboard would really look best in the guest bedroom. So while the doors will have a top coat that is black the bottom coat is going to be a mustardy-goldish color. In between we are going to try our hand at a crackle finish! I hope it turns out well. At first I was quite put out with the woman at the Lowe's paint counter.  (Our Home Depot, my store of preference, no longer carries crackle supplies because there isn't a huge need for it apparently in our area.) So I found myself at the Lowe's waiting for a good 15 minutes to talk to the paint specialist. My question was if I want the natural wood to show do I have to paint a base coat? And she informed me that yes I have to. I asked there isn't any other way to do it...nope. Fine. I waited all that time for two words. I probably would have been okay if she had at least been polite. Instead she reeked of smoke and glared at me...I think I interrupted  her smoke break. Whatever. Grouchy and put out I purchased only the crackling supplies and headed back to MECCA aka Home Depot to purchase my paint. So there's the first project...

And here's the second...

This is my kitchen the night before it was demo-ed. That hot pink post-it is a reminder to the contractor not to trash my cabinet doors. On a completely separate note I do not miss my old kitchen one bit. This picture is proof that the kitchen needed a face lift.


After a year in the cellar (yes, we actually have a cellar) they are a little dirty but no worse for the wear.  


Since we re-did the kitchen I have wanted to have something on the walls to highlight our college "family" but was unsure what I wanted and where. After much thought and the itch to have something new on the wall before they return in a few weeks I have decided. If you look closely my old cabinet doors have raised molding around the inside. I've decided that we are going to paint a magnetic primer on the inside portion followed by a chalkboard layer. The outside portion will be painted to look like a frame. The nasty brass pulls will be replaced with pewter ones to match the rest of the kitchen hardware. If it works out the way it looks in my mind I should end up with some fabulous art to hang on my wall...that can be filled with photos, quotes, doodles, and who knows what else when our students return.

In addition, I'm going to make an extra door for AG. We have stainless appliances and thus, he has no place to put magnetic ABCs, 123s, shapes, etc. Plus we don't have room in this house for an easel. So by giving him his own door we can place it on his play table, put it on the floor, tote it around the house, etc.

We'll see how it all works out. Should be fun and interesting since we've never crackled, painted with magnetic primer or chalkboard paint. More pictures to come...


PS- I couldn't leave you without showing an after photo of my kitchen because the before is pretty rough! Once I get the art on the walls I will have to take pictures of everything. For now this shot from Christmas works.

Tuesday, July 20, 2010

My latest treasure and the possibilities are endless...

I think I posted last week in my update post about changing out what I display in the den window. Here's my latest display. I'm quite pleased with it. While doing some work around the farm house (where Andy's mom lives) I came across this wooden piece in the basement. I asked what it was and if I could have it. Mama said that her dad (Andy's Granddad) used it to organize things in the barn. She asked what on earth I could do with it and I replied, "The possibilities are ENDLESS!" Truer words were never spoken. I am constantly thinking up new things I can display in it. (Just wait till Christmas!) I got it home and scrubbed it down real good. I like how rough and yet, simple it looks. At the moment I have no desire to paint it...but I'll never say never. :)

For it's first use I opted for displaying some of my Starbucks mugs. Yes, I have a Starbucks mug collection and, yes, I still don't drink coffee! My love of Starbucks mugs and ornaments is because of my sweet sister-in-law, Caroline, who use to work there. We collect mugs for each other and swap 'em back and forth. When I went to Hawaii I brought back a mug for her. They just recently moved from right outside of Nashville back to GA and she bought me the new Nashville mug. I'm hoping we'll find something when we head to Virginia this fall. Currently, it houses Nashville, San Diego, Hawaii, Pikes Place (the original Starbucks), Atlanta, Dallas, and Fort Worth. So here are a few pictures of my latest treasure...