Showing posts with label DIY. Show all posts

Sunday, March 3, 2013

Spring Break Plans...

Well, in planning AG's surgery we wanted to bump it next to Spring Break so that he could recover and miss the least amount of school as possible. Originally, we were prepared for it to be a really slow recovery from everything that everyone told us. However, AG has sailed through the entire thing. He hasn't had any pain medication since the actual operation. He flat out refuses it which is totally fine but we have been pleasantly surprised at how well he's done.

All that to say that I'm actually thinking we'll be able to get some projects around the house done this week. Quite refreshing...I miss posting DIY stuff that we have been working on around the house. We've started making our traditional spring/summer project wish list and looking at what we can tackle immediately. Today we are working on some projects in our bedroom. In addition, we are really looking at our house and the space we have. Long term we know that we will need more space but at the moment we can continue to make what we have work with some reorganizing/purging. We are also looking at small changes within this year like putting away the highchair and transitioning Avi-Kate to a big girl bed. These things will make the house feel bigger. We are actually already working on the highchair issue...it presents a unique situation due to how narrow our eat-in kitchen space actually is. One that will end up with it's own post once we finalize our plans. I've spent the last three days brainstorming different ideas with Andy. I'm excited about the possibilities.

More to come this week...

Friday, November 2, 2012

I'm in love with burlap...

...so like most people these days I love, love, love Pinterest. I joined waaaaay back when they were first starting and have enjoyed making it a place to save things that I want to do and remember. I will say that I don't pin every single thing that I see. I really and truly only pin things that I love or want to do or need to remember. If you would like to follow me you can find me here.

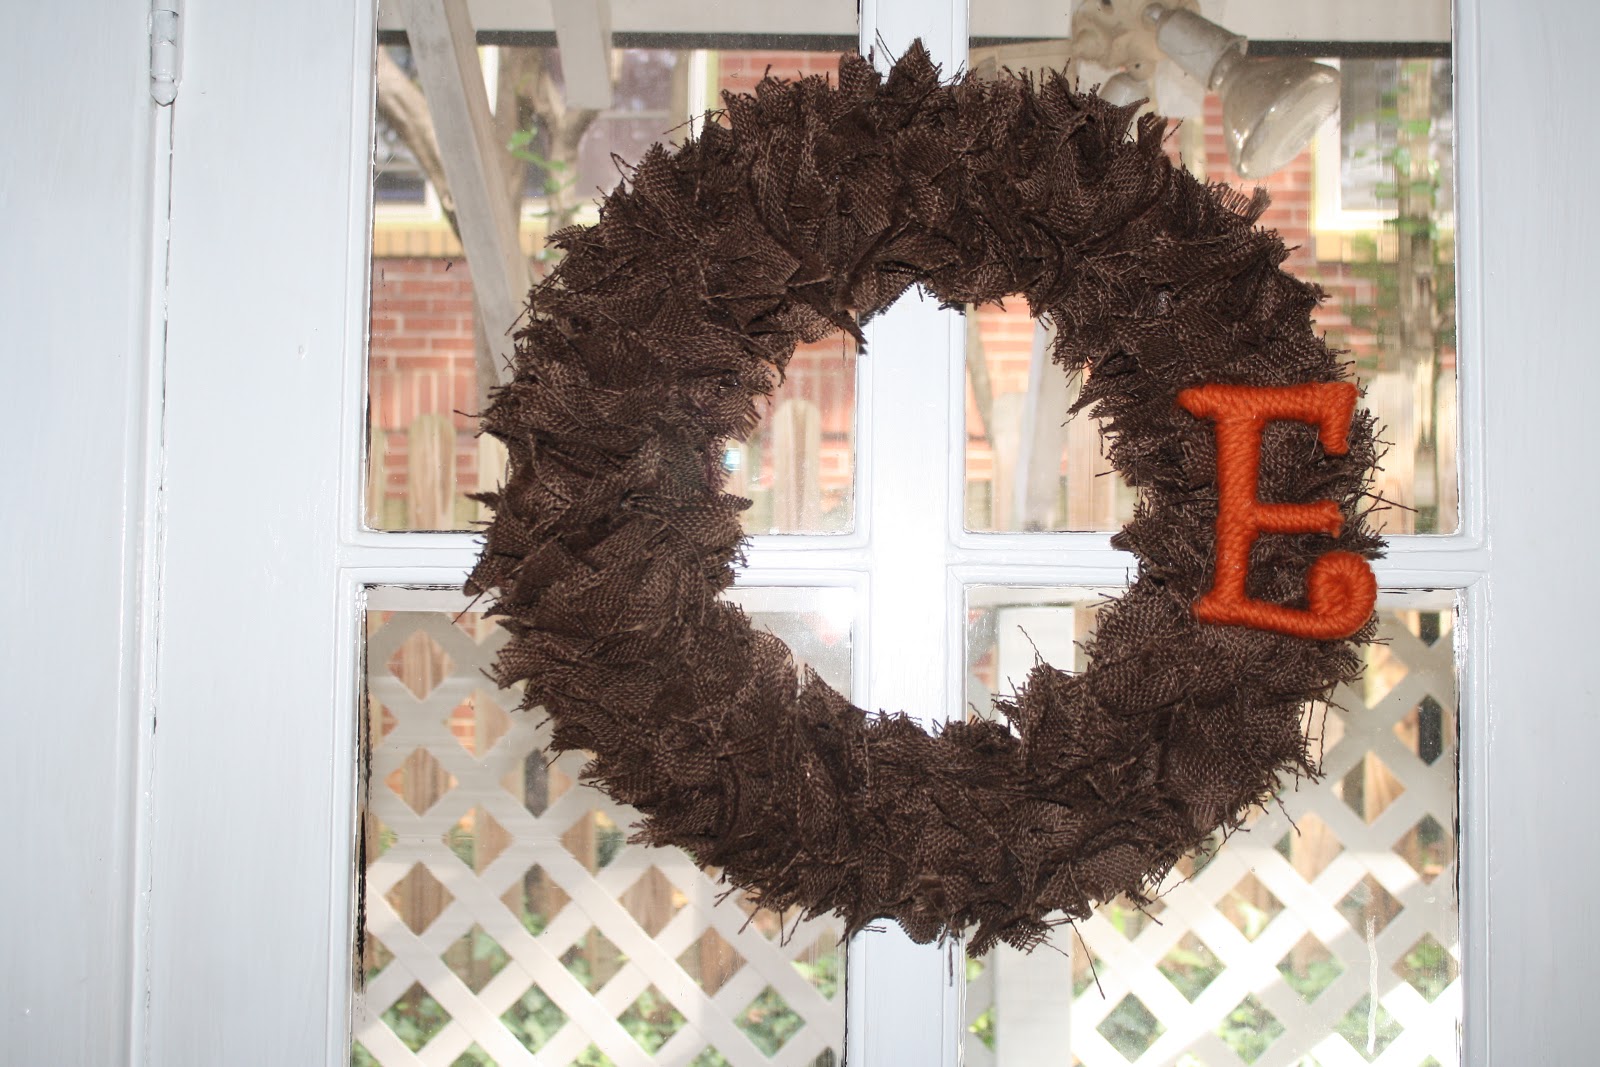
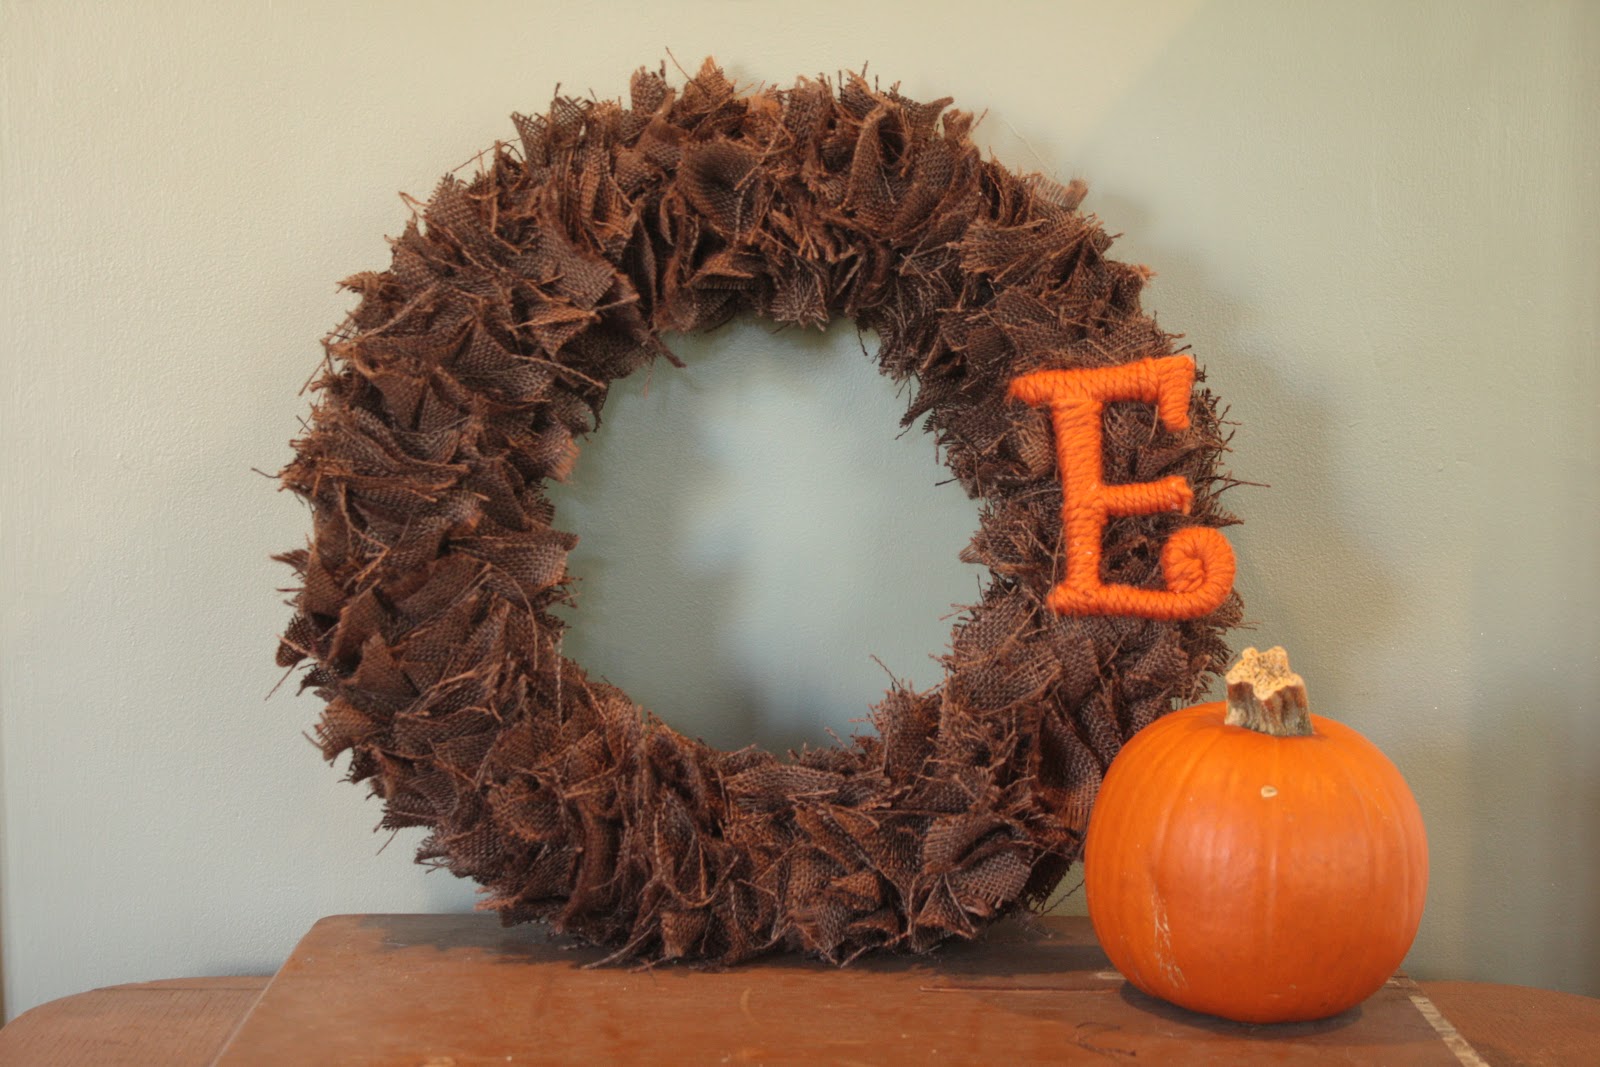
Now before Pinterest was around I discovered a wreath on a blog that I knew I could recreate. This was almost two years ago but I was pregnant at the time and then last year I had a small baby...who has time to craft when you have a new baby?! Anyways, this year I set about to creating a burlap wreath for the kitchen door for the fall. And while I was at it made one for my dear friend, Ginny.

Here's what I ended up with:
I'm in love with it. I have a TON of leftover yarn and I'm hoping that Ginny can show me how to knit/crochet some flowers to add to it for next year. But for now, and the craziness that is my life with two small kids, I'm pretty pleased with how it turned out. 

To make your own burlap creation you will need:

~Burlap--Any color. I did mine in chocolate and Ginny's is a neutral with a green tint to it. I used a full two yards on both wreaths. I wanted them to be really full. I bought all of my burlap at Hobby Lobby.

~Foam wreath form

~Scissors

~Hot glue

~Time! While this project isn't hard it does require a chunk of time to get it assembled. I watched one of the presidential debates while assembling mine.

~Letter--If you want to do a letter you'll need a wooden letter, yarn, and more hot glue.

Here we go:

Cut your burlap in to strips. You can be precise and make them two/two and a half inches each or you can eyeball it. I prefer to eyeball it and with this type of craft it won't matter which way you did it. 
 Cut your strips in to squares and stack them together. I would cut and stack in to several piles to be able to grab and go from.
 Next, fold your square in to a triangle and then fold it in to another triangle. You can put a dab of hot glue on the inside to make them hold their shape better.
 Wrap the point in hot glue and then stick it on your wreath. You can do this two ways you can make a bunch of triangles at once and then apply hot glue to the tip when you are ready to attach OR you can make them one at a time and attach as you go. I did it both ways and they both took about the same amount of time. Pick your preference and go with it.
Then, go to town and begin filling in. I wrapped/covered mine all the way around because I wanted the whole thing covered. Do it however you want. Also, heads up burlap sheds like crazy when you are cutting it/working with it. Once it is finished you won't have issues with it. 
Now for the letter...originally I had chosen big, thick, blocky type script for both my letter and Ginny's. However, I quickly realized that I was going to have a hard time getting it covered in yarn and looking 'clean' the way I wanted it to. I didn't want it to look tacky after all the time I spent on the wreath. I then picked up a smaller letter with thinner font and it was MUCH easier to cover. Take time and play with the yarn and the letter before you begin covering it for real. Once I got a section the way I wanted it I quickly unwrapped it and applied small dabs of hot glue in spots and quickly re-wrapped it. I did this section by section until it was finished. Here's what the 'E' looks like up close. 
I then took some craft wire and slipped it through the back of the E and then secured it to my wreath. I did it in such a way that I can easily remove it and change it out for something else if I want. 


 Hang and enjoy...and get lots of compliments on your handiwork. I've had several family members put in requests for wreaths now. :) I also wanted to hang mine with a satin ribbon but I couldn't find a ribbon that matched the yarn I used. I'll keep looking for next year. If I had had more time I was planning to make a red and black UGA wreath with burlap I picked up at Hobby Lobby...but I was doing good to get Ginny's done in September and mine done by Mtn. Day weekend. It's going on my to do list for next summer so it's ready in time for football next year. What craftiness have you been up to lately?


Tuesday, July 3, 2012

Tot School...Homemade Math Manipulatives.

Being a teacher in my former life means that my wheels are constantly turning on a day to day basis when it comes to learning at home with our kids. Most children couldn't live with out apple juice or milk not so for AG. If he was stranded on an island and could have an endless supply of something it would be Simply Orange Orange Juice. And yes, he's very brand loyal and refuses to drink anything but Simply Orange. Anyways, months ago I began to wonder if there was something I could make with all the lids we recycle. They are the perfect size to pick up with small hands and so I began to stock pile lids. A few weeks back I decided to make my first project...a set of numbers 1-10. So, I found a set of numbers online that I liked and printed them off. Then I used my 2in circle punch from Creative Memories to cut them all out and I attached them with a nice coat of rubber cement. Pretty easy if you ask me. Here's what they look like:
Now I have enough tops to make more numbers and a set of ABCs...I just haven't had the time to finish them. The possibilities are endless with this concept. In addition to saving OJ tops I have been saving baby food pouch tops. For whatever reason my kids hit 9/10 months and refuse to be spoon fed. This time around we've been able to buy Avi-Kate baby food in pouches to use in addition to the table food that she eats. (At 9 months AG was completely on table food!) Well, these tops are great and I've just been stashing them away. This past week we pulled them out along with the OJ tops for the first time and AG was beside himself with excitement. Here's what we did:
First, he organized the OJ lids in numerical order.
 Then, he wanted to sort all the tops in to piles by color...I said go for it. :)
 Sweet boy hard at work.
 Once he had everything sorted the way he wanted it he began to count out the tops to correspond with each OJ lid.
 To take it one step further I pulled out a set of Mickey Number Flashcards from the fabulous $1 section at Target. He then matched the cards to each lid. 

 Excited that he did it all by himself. 


We are really working on numbers 1-10 at the moment and will move on to 11-20 soon. AG's 'lessons' are based on whatever he is interested in at the moment and we try and do something together when Avi-Kate naps. Some days we do 'school' and other days we don't I am merely using it as a way to introduce concepts so that when he starts school this fall he has something to jump off of. It's very low key and a great way for us to do something one on one. Have you made any homemade manipulatives?

Wednesday, July 27, 2011

AG's big boy room...

...it dawned on me that I, in my pregnant state these last few months, forgot to post what we did to AG's room this spring. (Sigh) Anyways, it still needs a few things done to it but overall it looks pretty good. We painted it grey and AG picked a shade known as 'Mickey's Shadow'...how appropriate. He wanted to help and so we suited him up in an old onesie and let him go to town. Later, Andy finished it all by himself. He then built, painted and installed hanging shelves for the wall along with two new bookcases. I've decided that there are very few things in this world that my husband can not do. He's quite talented. I still need to do something on the windows, get a bunch of prints framed and hung, and decide what to do with the shelf over AG's bed. Oh, and find a rug. Now if I could get Avi-Kate's room finished...


Sunday, August 29, 2010

Finished Projects

Here are a few snapshots of my two recent projects around the house. I'm thrilled with how well both of them turned out. I've already started making a list of other projects that I'd like to do this fall. Some things include: building a frame  to put over the mantle in the living room, refinishing the coat rack Andy's grandfather made, and a photo display out of some old shutters I found in the cellar. I'll be sure to post photos of our new projects but for now...

The finished headboard in the guest bedroom

The crackle up close.


Chalkboards finished and on the walls. Our students wasted no time putting them to good use.


Love You More above the door to the front hall from the kitchen.