Now before Pinterest was around I discovered a wreath on a blog that I knew I could recreate. This was almost two years ago but I was pregnant at the time and then last year I had a small baby...who has time to craft when you have a new baby?! Anyways, this year I set about to creating a burlap wreath for the kitchen door for the fall. And while I was at it made one for my dear friend, Ginny.
Here's what I ended up with:
I'm in love with it. I have a TON of leftover yarn and I'm hoping that Ginny can show me how to knit/crochet some flowers to add to it for next year. But for now, and the craziness that is my life with two small kids, I'm pretty pleased with how it turned out.
To make your own burlap creation you will need:
~Burlap--Any color. I did mine in chocolate and Ginny's is a neutral with a green tint to it. I used a full two yards on both wreaths. I wanted them to be really full. I bought all of my burlap at Hobby Lobby.
~Foam wreath form
~Scissors
~Hot glue
~Time! While this project isn't hard it does require a chunk of time to get it assembled. I watched one of the presidential debates while assembling mine.
~Letter--If you want to do a letter you'll need a wooden letter, yarn, and more hot glue.
Here we go:
Cut your burlap in to strips. You can be precise and make them two/two and a half inches each or you can eyeball it. I prefer to eyeball it and with this type of craft it won't matter which way you did it.
Cut your strips in to squares and stack them together. I would cut and stack in to several piles to be able to grab and go from.Next, fold your square in to a triangle and then fold it in to another triangle. You can put a dab of hot glue on the inside to make them hold their shape better.
Wrap the point in hot glue and then stick it on your wreath. You can do this two ways you can make a bunch of triangles at once and then apply hot glue to the tip when you are ready to attach OR you can make them one at a time and attach as you go. I did it both ways and they both took about the same amount of time. Pick your preference and go with it.
Then, go to town and begin filling in. I wrapped/covered mine all the way around because I wanted the whole thing covered. Do it however you want. Also, heads up burlap sheds like crazy when you are cutting it/working with it. Once it is finished you won't have issues with it.
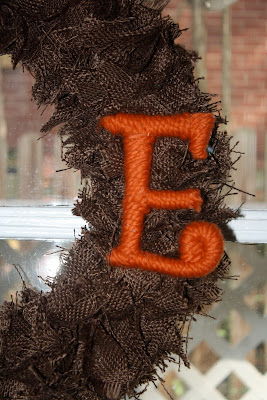
Now for the letter...originally I had chosen big, thick, blocky type script for both my letter and Ginny's. However, I quickly realized that I was going to have a hard time getting it covered in yarn and looking 'clean' the way I wanted it to. I didn't want it to look tacky after all the time I spent on the wreath. I then picked up a smaller letter with thinner font and it was MUCH easier to cover. Take time and play with the yarn and the letter before you begin covering it for real. Once I got a section the way I wanted it I quickly unwrapped it and applied small dabs of hot glue in spots and quickly re-wrapped it. I did this section by section until it was finished. Here's what the 'E' looks like up close.
I then took some craft wire and slipped it through the back of the E and then secured it to my wreath. I did it in such a way that I can easily remove it and change it out for something else if I want.
Hang and enjoy...and get lots of compliments on your handiwork. I've had several family members put in requests for wreaths now. :) I also wanted to hang mine with a satin ribbon but I couldn't find a ribbon that matched the yarn I used. I'll keep looking for next year. If I had had more time I was planning to make a red and black UGA wreath with burlap I picked up at Hobby Lobby...but I was doing good to get Ginny's done in September and mine done by Mtn. Day weekend. It's going on my to do list for next summer so it's ready in time for football next year. What craftiness have you been up to lately?


.jpg)


No comments:
Post a Comment